
Installation & Directions
Feeling’s Flame Electric Candle Directions
Unboxing the Feeling’s Flame® Electric Candles: The Feeling's Flame® electric candles are designed for durability once installed in your light fixtures. To ensure the longevity of the "flame" mechanism, handle it with care during unboxing. Avoid twisting or bending the "flame" when removing the candles from their packaging. Use the protective packaging material to secure the electric candle. When taking the candles out of the box, grip them by the finger holes located in the middle of the packaging. The included plastic candle sleeve can be trimmed to simulate a wax candle sleeve, allowing you to customize its length with household scissors.
Adjusting the Length of the Light Fixture Socket: Begin by removing the existing light bulbs and candle sleeves from each light socket in your fixture. This will expose the electrical sockets, which can typically be adjusted for height based on the manufacturer's design. The height adjustment is critical, as the Feeling's Flame® electric candle will be inserted into this socket, with the candle sleeve fitting over it. The bottom of the "flame" should be positioned approximately 10 millimeters from the top of the candle sleeve. After adjusting the socket, trim the candle sleeve with household scissors to achieve your desired height.
Installing the Electric Candle into the Socket: To install the Feeling's Flame® electric candle, hold only the plastic base while twisting it into the socket. Once the electric candle mechanism is securely in place, gently slide the candle sleeve down over the "flame" to cover the entire socket. It is Important to NEVER twist or apply stress to the "flame" portion of the candle mechanism during this entire process.
Inspired Light Bulb Directions
Unpack the Candle Bulbs: Begin by carefully removing your candle bulbs from their packaging. Use the finger holes located inside the box for a secure grip.
Prepare Your Light Fixture: Ensure that you have unscrewed the existing light bulbs from your candelabra light fixture.
Install the Inspired Light Bulbs : Simply screw the Inspired Light bulbs into the empty sockets of your existing candelabra light fixture. It’s as easy as replacing a traditional light bulb!
With these simple steps, you can effortlessly create beautiful candlelight in your space.
Measurement & Installation

Important Installation Directions
Please carefully read the following for directions on installing a candle cover.
- Beeswax candle covers must be limited to a maximum incandescent bulb of 25 watts. You may safely use any wattage LED bulb.
- Resin and cardboard candle covers can safely handle bulb wattage of 60W when installed correctly.
- If using an incandescent bulb: When determining the height, the top of the candle cover should fit level with the top of the socket or cardboard insulator, but never above. Incorrectly installed beeswax candle covers (too tall) will melt. Resin candle covers that are too tall may scorch. When using an LED bulb you can safely cover all of the metal base of the bulb. This will result in the best possible appearance.
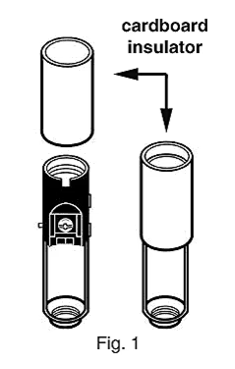
Always include the U.L. listed cardboard insulator that covers the socket terminals. The terminals are the screws where the wires are attached. (see Fig. 1). Failure to include the insulator may create an electrical hazard. If the cardboard insulator is worn or brittle from age, it should be replaced. Some modern sockets do not have the terminals exposed and in this case will not have a cardboard insulator. If the wiring or socket appears damaged in any way you should replace the socket and all of the wiring connected to the socket. You may need to contact a professional lamp restorer who can give you advice and/or an estimate for re-wiring the lamp or fixture.
Determining the Correct Socket Type and Candle Cover Height
To determine the correct candle cover size you must carefully measure for the correct diameter as shown in Fig. 2 below. This is an important step since our candle covers are manufactured using lighting industry standard sizing.
There are two common socket sizes on U.S. lighting. Most lamp sockets are either a candelabra size or an Edison (also known as ‘medium base’ or ‘standard’) size. Of these two, candelabra is by far the most common. There are, however, some uncommon sizes including “intermediate” or European sizes for which candle covers and replacement cardboard insulators are very difficult to locate. It is possible for us to manufacture European sizes by custom order in beeswax only, but not in resin. You can locate these in our beeswax collection. Feel free to contact us if you think that you have a European size.
Please follow these directions to determine the socket size and the necessary height for your candle cover:
- IMPORTANT: Please do not rely on the height of your existing candle cover unless you determine that it has been installed correctly. A large number of candle covers are installed too tall.
- A candelabra socket has an outside diameter of 3/4” (shown in Fig. 2 below) and will require a candelabra candle cover. This candle cover has an inside diameter of 13/16” to allow it to fit comfortably over the socket.
- A medium base socket (or Edison) has an outside diameter of approximately 1-1/8” and will require a medium base candle cover which has an inside measurement of 1-3/16” (See Fig. 3 below).
- A European size socket has an outside diameter of approximately 15/16" or just under 1" diameter. (see Fig. 4 below) This socket will require our European size candle cover which has an interior of 1". Replacements are available only in beeswax.


- To determine the height, measure from the point where the bottom of the candle cover will sit up to the top of the socket. If you are using an LED bulb you should measure to the top of the metal base of the bulb. As a reminder, do not base your measurement on an existing candle cover unless it has been installed correctly. If your socket includes a cardboard insulator this is considered part of the socket and should be included when measuring.
- When using LED bulbs you should cover all of the metal base of the bulb. LED bulbs sit taller in a socket and the metal base protrudes out of the socket. Since they do not produce a lot of heat you should cover all of this metal bulb base with our candle cover. This will result in the best possible appearance.
- IMPORTANT NOTE REGARDING CANDLE WIDTH: Please also ensure that the outside diameter of our product as shown on our product page will fit. All of our candle covers have larger exteriors than most plastic candle covers available. If your fixture has a plastic candle cover that fits tightly inside a holder it will be important to verify the exterior measurement. Please contact us if you need assistance.
